-
-
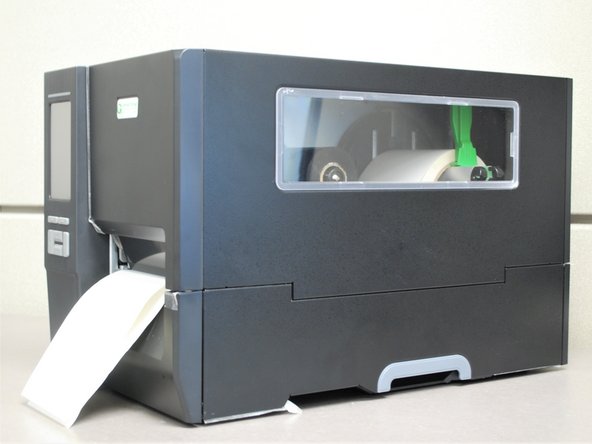
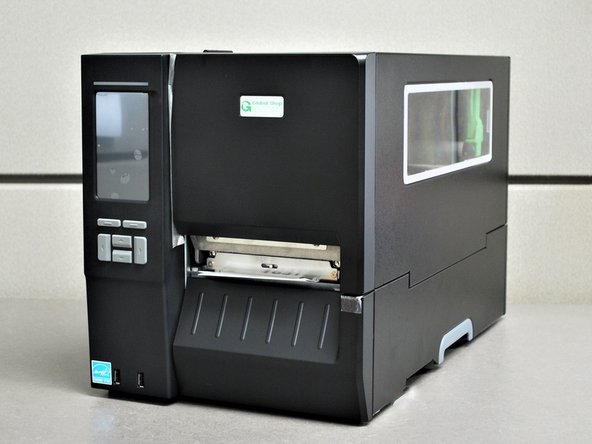
Thank you for purchasing the GSS-LABEL-PTR-I!
-
If any time during this guide you get lost or confused, please feel free to reach out to us at EMS for Support.
-
You can book an appointment under '000 - Support,' or click HERE.
-
Service is Standard!
-
-
-
A. One printer unit
-
B. Four Rolls of Labels (Two 4x6 & Two 4x2 Direct Thermal Rolls)
-
C. One power cable
-
D. One ethernet cable
-
E. One USB Cable
-
F. One Quick Start Guide with Cleaning Pen
-
G. Three year warranty (not pictured)
-
Please make sure to keep the box and protective packaging in case you ever need to return this printer. These boxes are custom and ensure safe transportation of the printer.
-
-
-
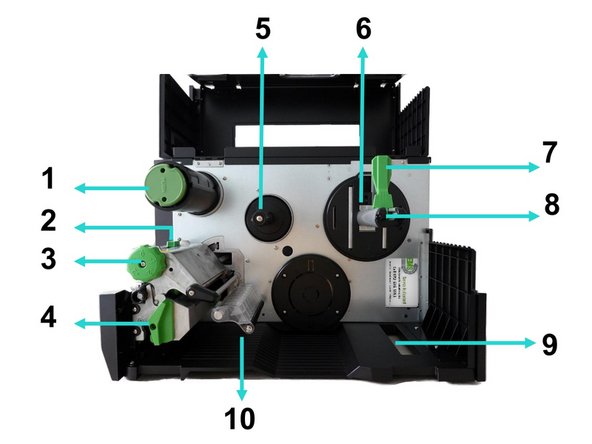
1. Ribbon rewind spindle
-
2. Print head pressure position adjustment knob
-
3. Print head pressure adjustment knob
-
4. Print head release lever
-
5. Ribbon supply spindle
-
6. Media near end sensor
-
7. Label roll guard
-
8. Label supply spindle
-
-
-
9. External label entrance chute
-
10. Damper
-
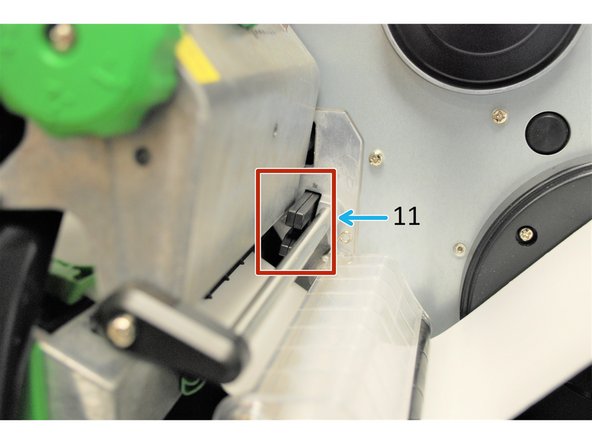
11. Ribbon sensor
-
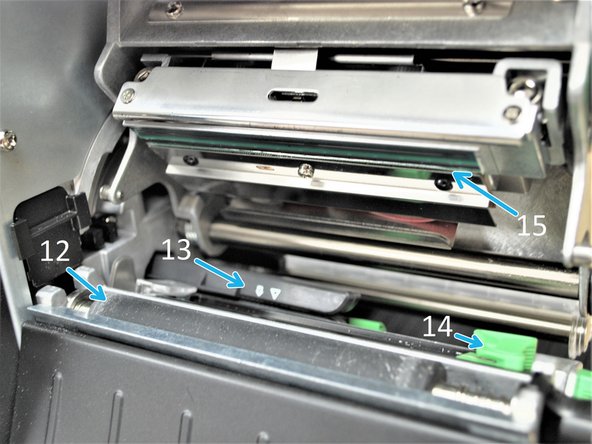
12. Platen roller
-
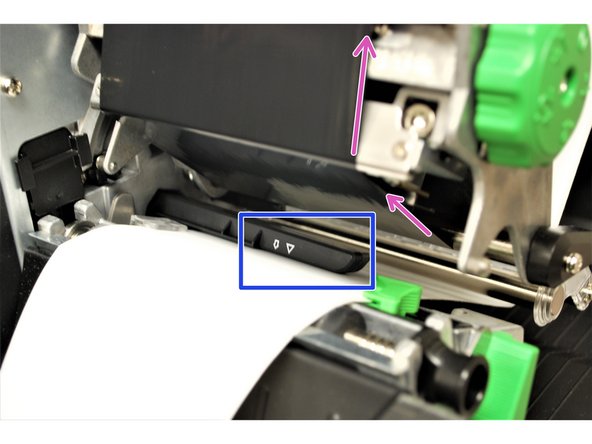
13. Media sensor (shown as ↓ ▽))
-
14. Front label guide
-
15. Print head
-
-
-
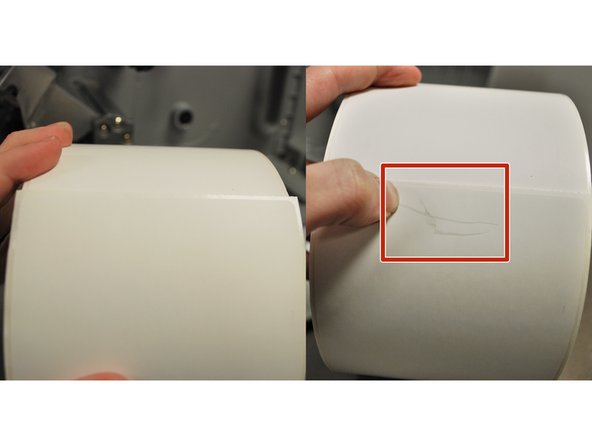
Scrape your thumbnail along your labels.
-
Thermal Transfer labels will not show a grey mark and does use ribbon. (Shown on Left)
-
Direct Thermal labels will show a grey mark and does not use ribbon. (Shown on Right)
-
If you have Direct Thermal, go to Step 6 or click HERE.
-
If you have Thermal Transfer, go to Step 13 or click HERE.
-
-
-
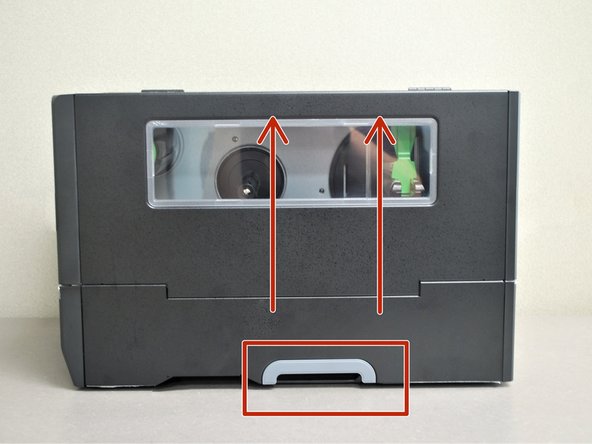
Grab the bottom of the cover and lift all the way open, until it's resting on the top of the printer.
-
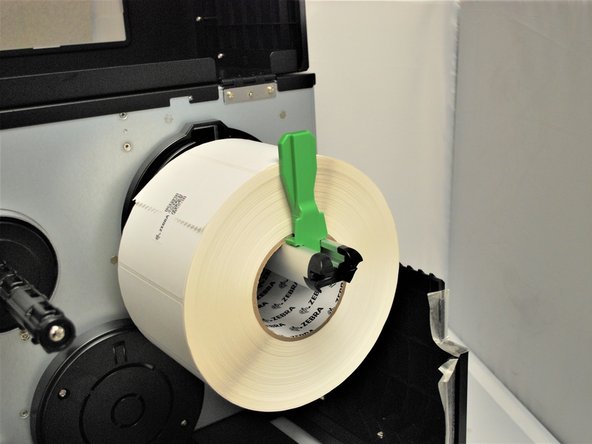
Locate the green label roll guard pictured and pull away from the printer.
-
Be sure to grab this by the bottom of the guard to help pull it with ease.
-
Fold down the label roll guard away from the printer.
-
-
-
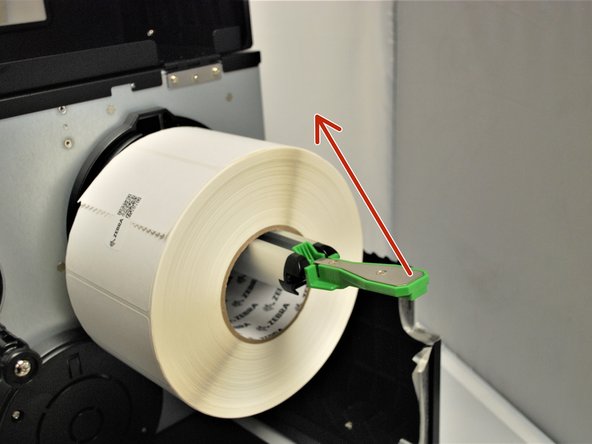
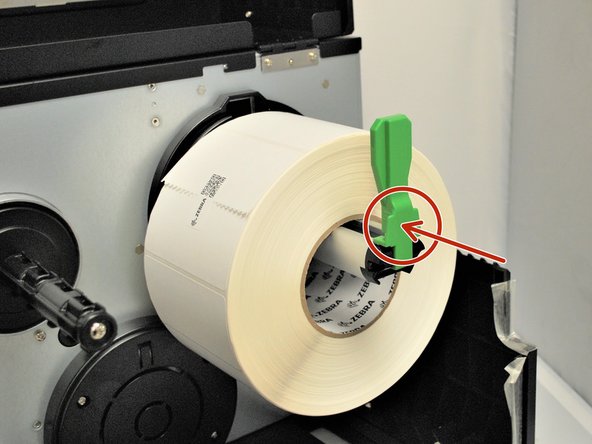
Place the roll of labels on the label supply spindle, so that they unroll from the top
-
Fold the label roll guard back up.
-
Press the label roll guard against the side of the roll.
-
Be sure to press this by the bottom of the guard to help push it with ease.
-
-
-
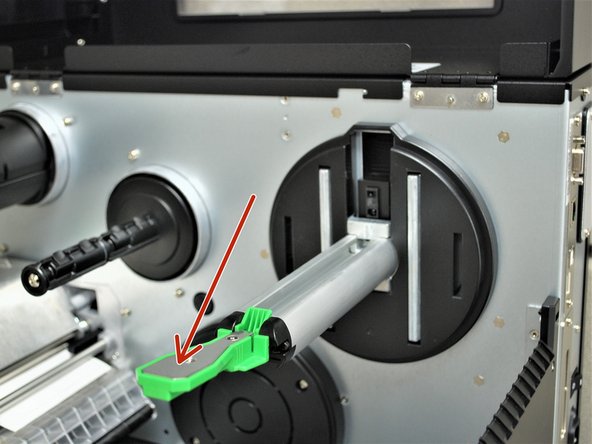
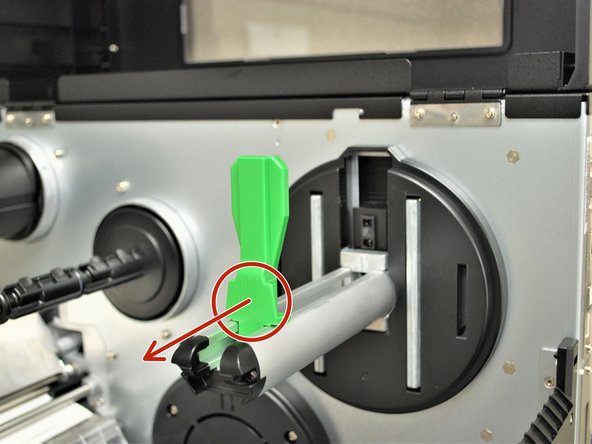
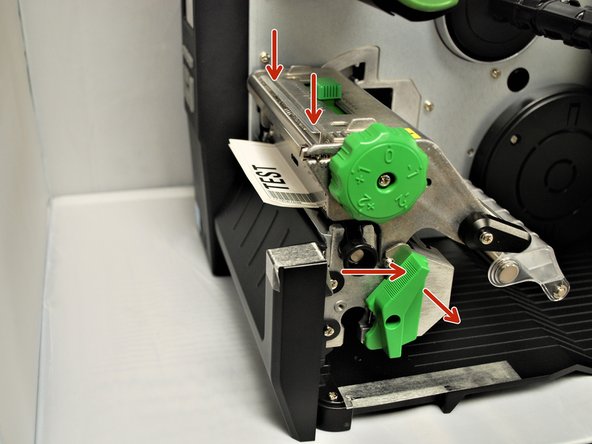
With one hand, press down on the top of the printhead.
-
With the other hand, rotate the green print head release lever clockwise.
-
Remove your hand from the printhead and the printhead should now be able to be lifted up.
-
-
-
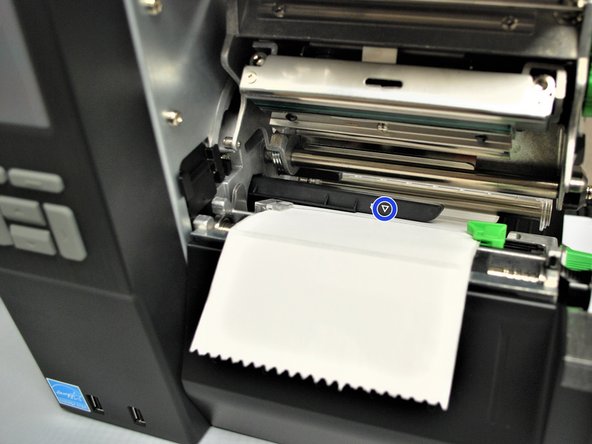
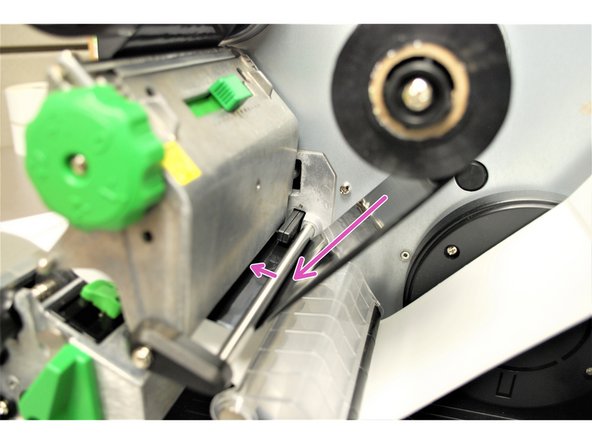
Feed the labels under the damper roller (1st picture).
-
Feed the labels through/under the black media sensor (blue arrow in the picture) and clear label guide (orange arrow in picture).
-
Pull through until the leading edge of one label is even with the perforated tear-off edge (pink arrows).
-
The length of the label shown may vary from your own. Be sure to pull it through to a distance equivalent to one label to the first tear-off edge.
-
-
-
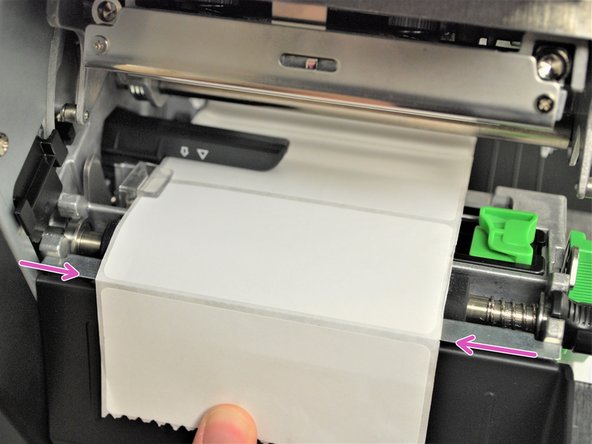
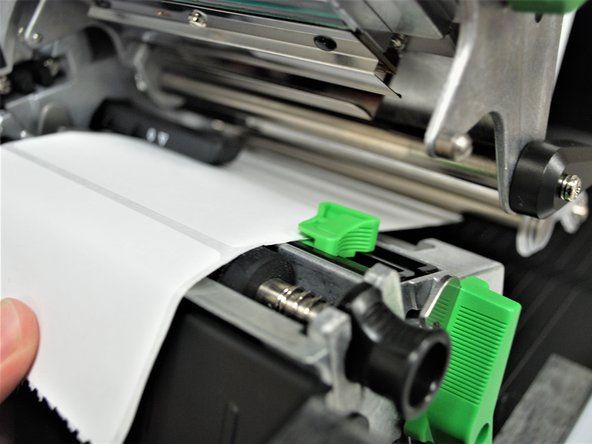
Make sure the far edge of the label roll lines up with the clear label guide.
-
Slide the green front label guide forward until it fits against the close edge of the labels.
-
These guides keep the labels running straight, so it's important to make sure they're not so tight they stop the labels from coming out smoothly.
-
-
-
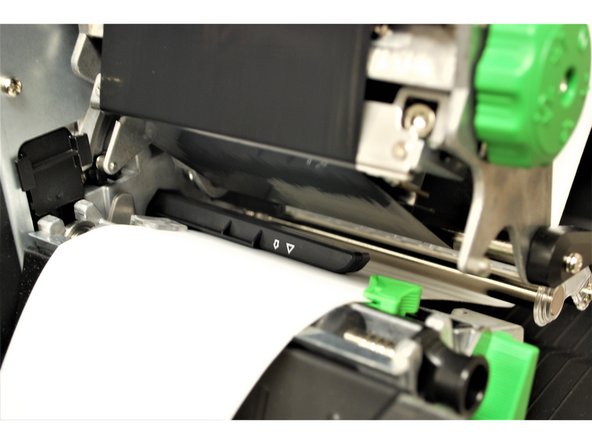
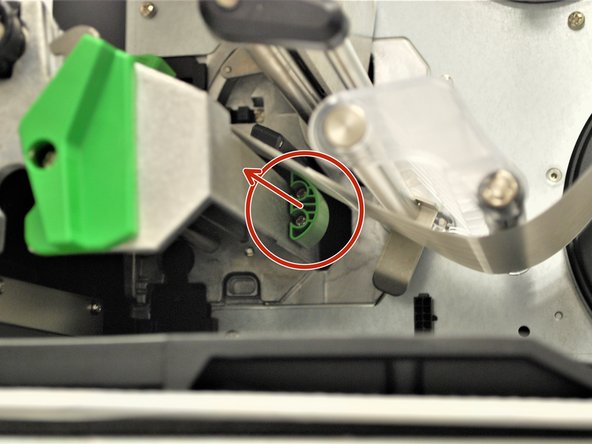
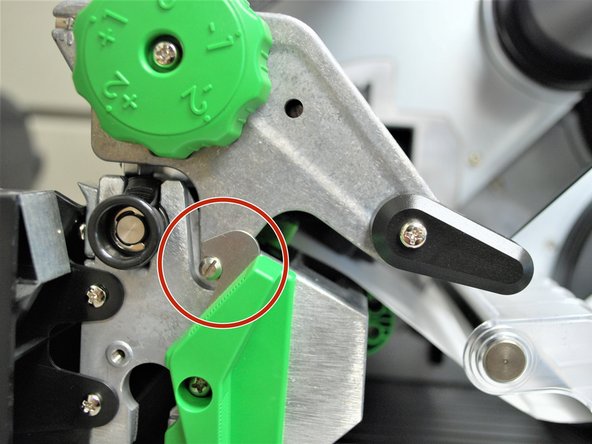
Use the green tab (first picture) underneath the damper roller to adjust the media sensor.
-
Center the Triangle (shown as ▽) located on the media sensor over the middle of the labels. This is shown by the blue circle in Image 2.
-
The gap sensor marking indicates the position of the sensor the printer uses to calibrate, so it's important to make sure it's in the right place.
-
-
-
Check the path of the labels. It should look like the first picture here.
-
Close the printhead by pressing down firmly on top until you hear a 'click,' making sure that the green print head release lever is latched closed.
-
Close the cover.
-
Now that Direct Thermal labels are loaded, skip to Step 24 or click HERE.
-
-
-
Grab the bottom of the cover and lift all the way open, until it's resting on the top of the printer.
-
Locate the green label roll guard pictured and pull away from the printer.
-
Be sure to grab this by the bottom of the guard to help pull it with ease.
-
Fold down the label roll guard away from the printer.
-
-
-
Place the roll of labels on the label supply spindle, so that they unroll from the top
-
Fold the label roll guard back up.
-
Press the label roll guard against the side of the roll.
-
Be sure to press this by the bottom of the guard to help push it with ease.
-
-
-
With one hand, press down on the top of the printhead.
-
With the other hand, rotate the green print head release lever clockwise.
-
Remove your hand from the printhead and the printhead should now be able to be lifted up.
-
-
-
Feed the labels under the damper roller (1st picture).
-
Feed the labels through/under the black media sensor (blue arrow in the picture) and clear label guide (orange arrow in picture).
-
Pull through until the leading edge of one label is even with the tear-off edge (pink arrows).
-
The length of the label shown may vary from your own. Be sure to pull it through to a distance equivalent to one label to the first tear-off edge.
-
-
-
Make sure the far edge of the label roll lines up with the clear label guide.
-
Slide the green front label guide forward until it fits against the close edge of the labels.
-
These guides keep the labels running straight, so it's important to make sure they're not so tight they stop the labels from coming out smoothly.
-
-
-
Use the green tab (first picture) underneath the damper roller to adjust the media sensor.
-
The triangle (shown as ▽) on the media sensor (shown with a blue circle in the 2nd picture) should be approximately centered on the label.
-
The media sensor marking indicates the position of the sensor the printer uses to calibrate, so it's important to make sure it's in the right place.
-
-
-
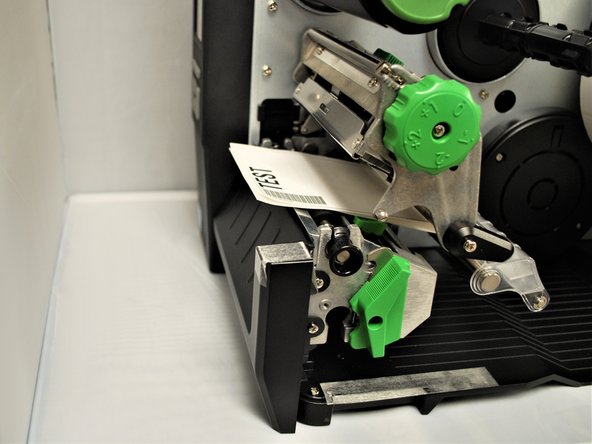
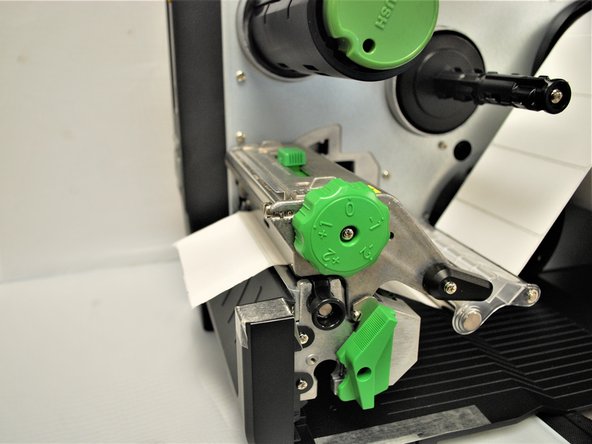
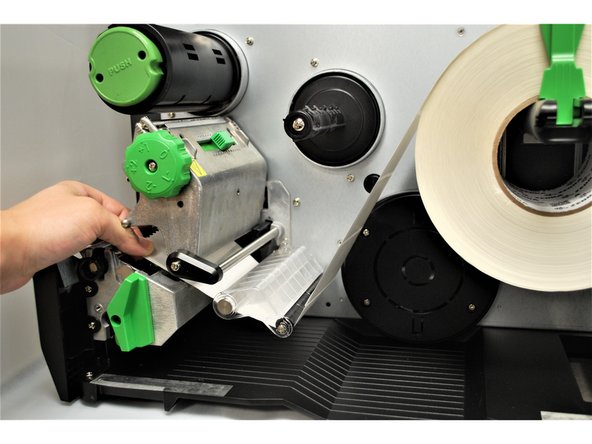
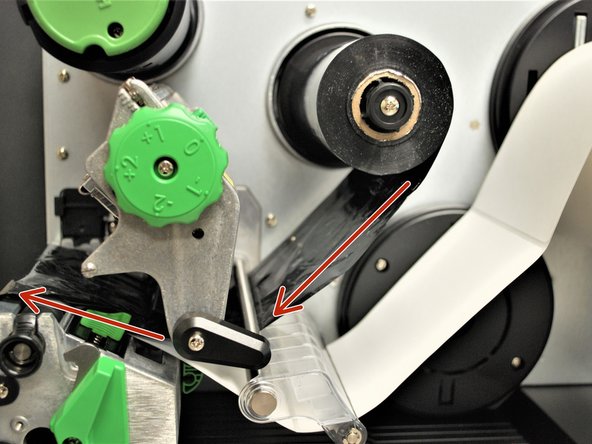
Place the roll of ribbon on the ribbon supply spindle - the black plastic spindle located a little bit above and behind the print head.
-
Identify the Ribbon Sensor located behind the printhead (shown by the orange box in Image 2).
-
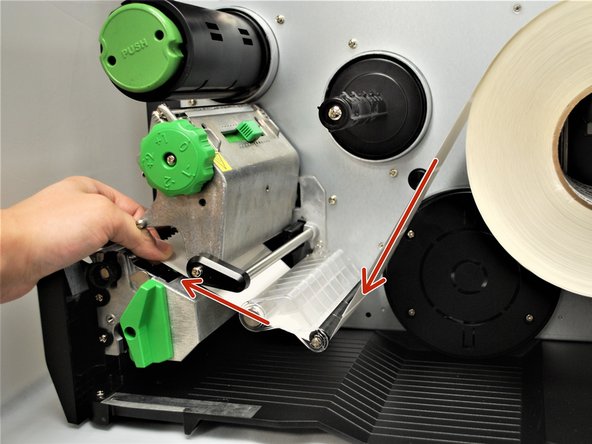
Feed the Ribbon through the Ribbon Sensor following the purple arrows in Image 3.
-
-
-
Feed the ribbon under the printhead and out to the front, making sure to feed it above the media sensor (the black clip on the bottom of the printhead, shown by the blue box).
-
The path of the ribbon is shown by the pink arrows.
-
-
-
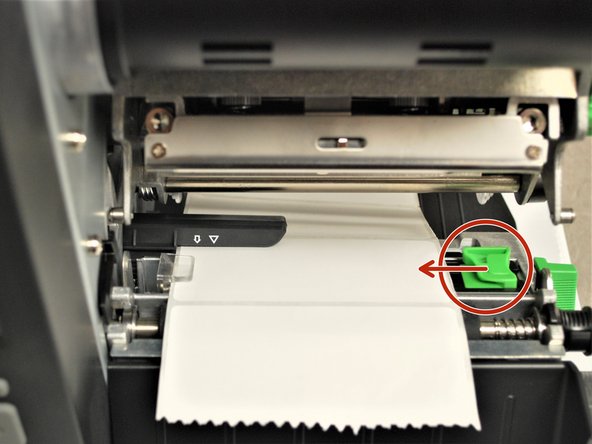
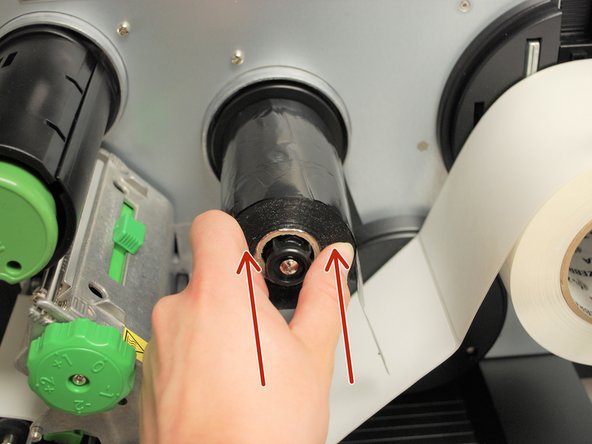
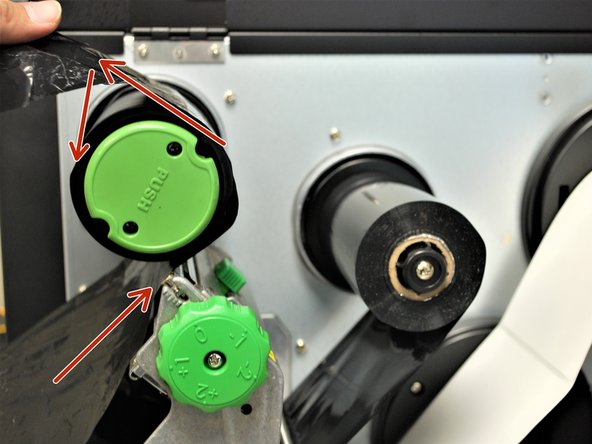
Wrap the ribbon around the rewind spindle.
-
While keeping the ribbon on the rewind spindle. push and hold the green button that says "PUSH" on the spindle.
-
While holding the green 'PUSH' button, rotate the whole spindle counter-clock wise until the slack is removed from the ribbon.
-
-
-
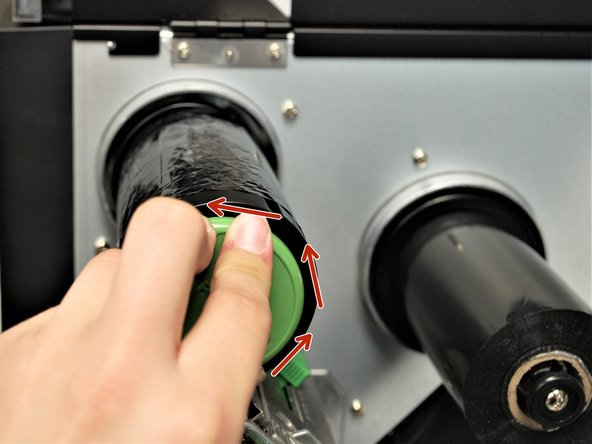
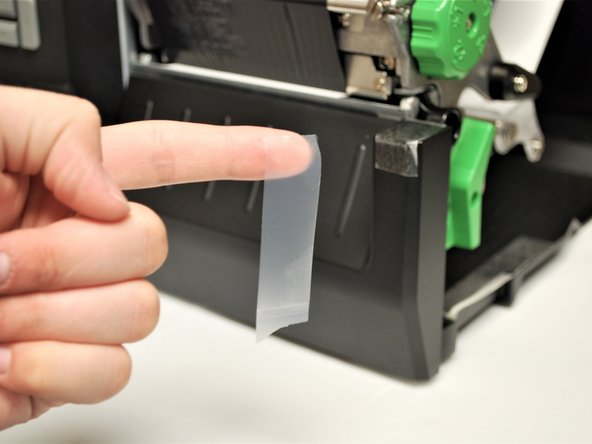
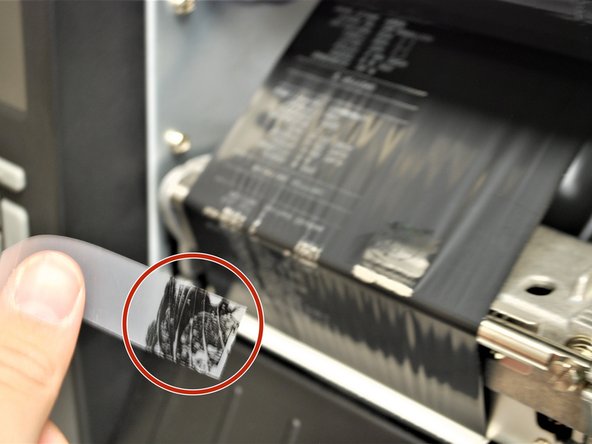
Test the orientation of the ribbon:
-
Get a piece of regular tape.
-
Put the piece of tape on the ribbon.
-
Remove the piece of tape.
-
If there is ink on the tape and ink came off the ribbon, the ribbon is facing the correct direction. If there is no ink, repeat Steps 19-21 with the ribbon facing the correct direction.
-
-
-
Close the printhead by pressing down firmly on top until you hear a 'click,' making sure that the green print head release lever is latched closed.
-
Close the cover on the printer.
-
-
-
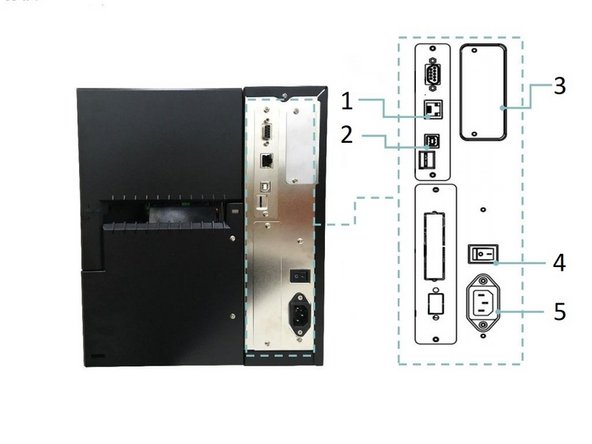
1. Ethernet interface
-
2. USB interface
-
3. Slot-in Wi-Fi interface (Option)
-
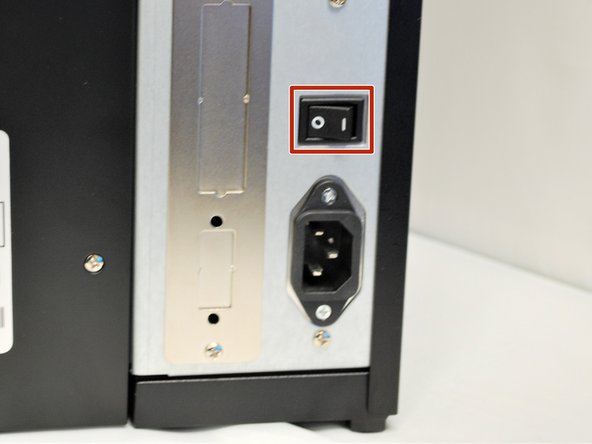
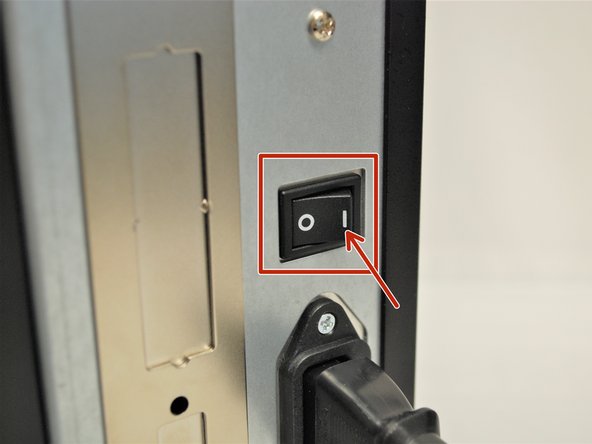
4. Power switch
-
5. Power cord socket
-
-
-
Place the printer on a flat, stable surface.
-
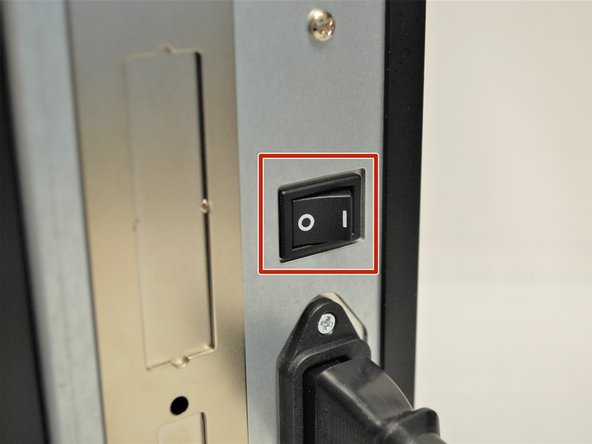
Make sure the power switch is off.
-
-
-
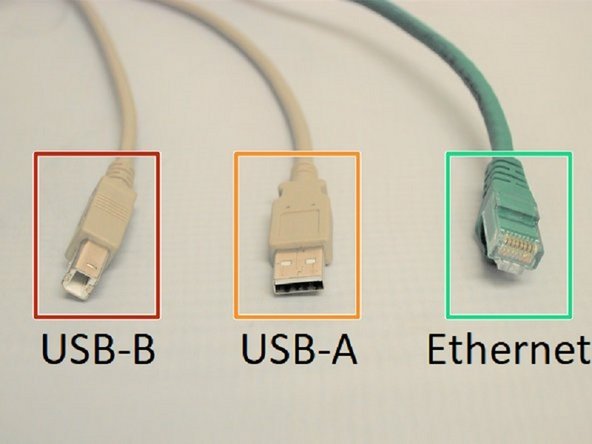
USB-B
-
USB-A
-
The USB-B and USB-A are two ends of the same cable. The USB-B to USB-A cable is only used for initial set-up and support. It should NOT be used to print labels from GlobalShop Software.
-
Ethernet
-
This cable is double ended with an ethernet jack on both sides. This is used for wired network connection, a network type which connects devices to the Internet or other networks using cables.
-
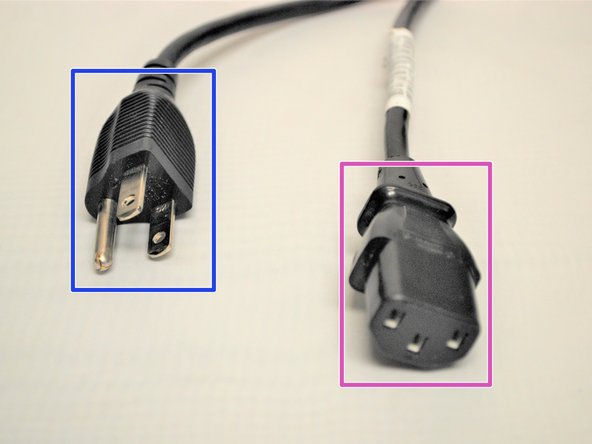
Power Outlet Plug
-
Printer Power Plug
-
The Power Outlet Plug and the Printer Power Plug are two ends of the same cable.
-
-
-
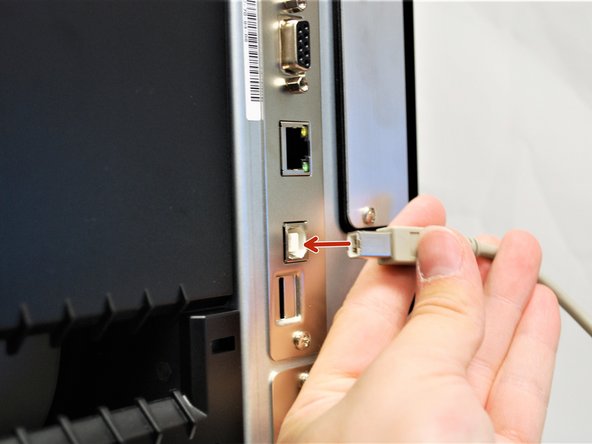
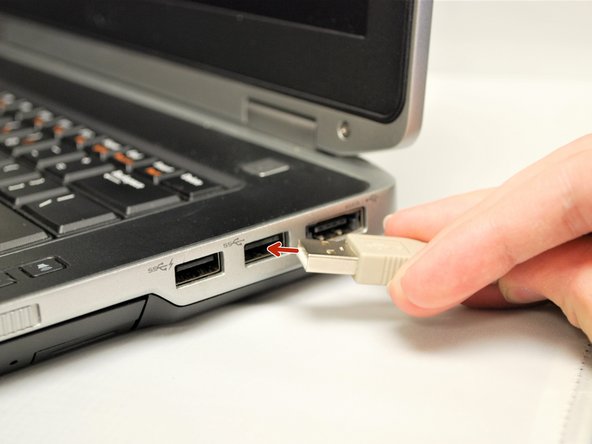
Plug the USB-B into the printer's USB interface on the back.
-
Only use the USB port on the back of the printer
-
Plug the USB-A into your computer/laptop's USB port.
-
To correctly identify the USB-B from the USB-A, please refer to the last step.
-
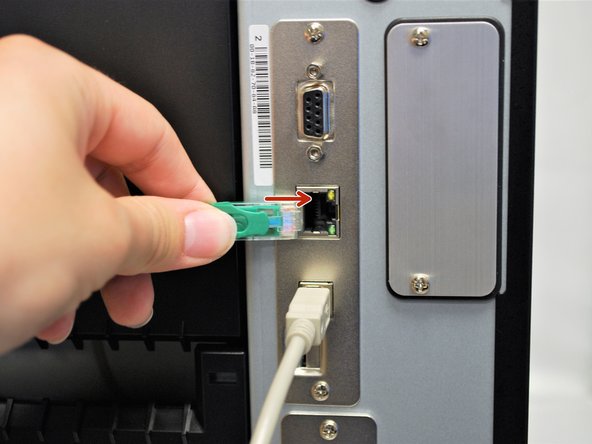
Connect one end of the ethernet cable to your printer's ethernet interface on the back.
-
Connect the other end of the ethernet to your network.
-
-
-
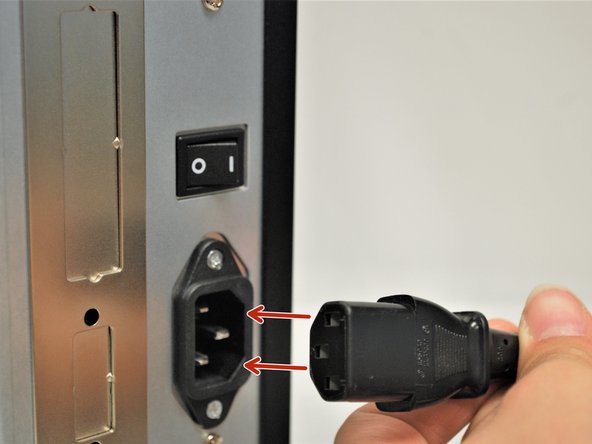
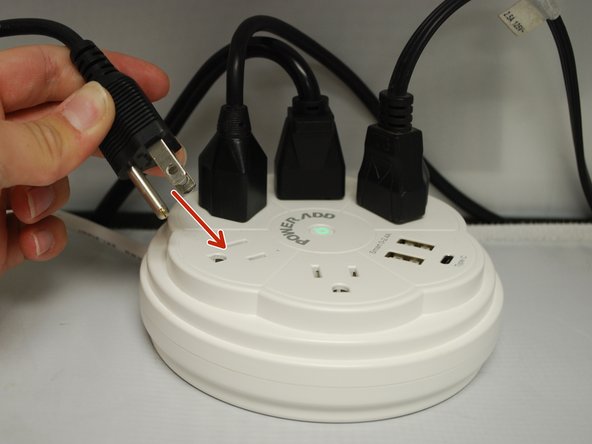
Connect the Printer Power Cord into the back of the printer in the power cord socket.
-
Make sure the printer is OFF before continuing and plugging it into the wall.
-
Once the Printer Power Cord is connected and the printer is off, connect the Power Outlet Cord into a power outlet.
-
DO NOT turn the printer on without the labels being loaded first. See how to load labels starting at Step 5 or click HERE.
-
-
-
DO NOT turn the printer on without the labels being loaded first. See how to load labels starting at Step 5 or click HERE.
-
Turn on the printer.
-
During the printer's powering up process, it will auto calibrate resulting in a few blank labels being printed.
-
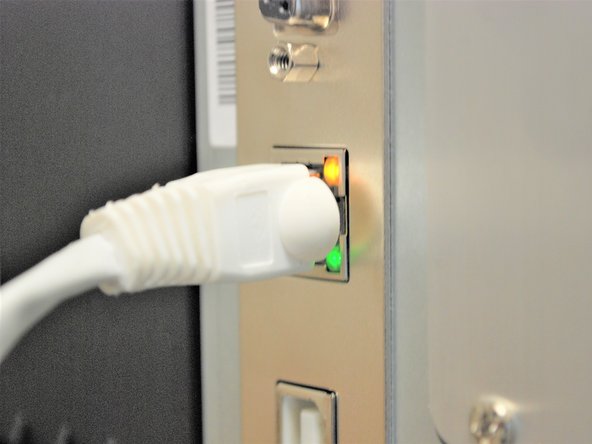
Now that the Ethernet is connected and the Printer has power, two LEDS will light up by the ethernet port.
-
The amber light will stay solid while the green light will be blinking.
-
-
-
Now that the USB-B is connected and the Printer has power, you will be able to connect to the printer in the GSS Certified Printer Tool. Ensure you open this program on the same device the printer is connected to via USB.
-
To download the GSS Certified Printer Tool, click HERE.
-
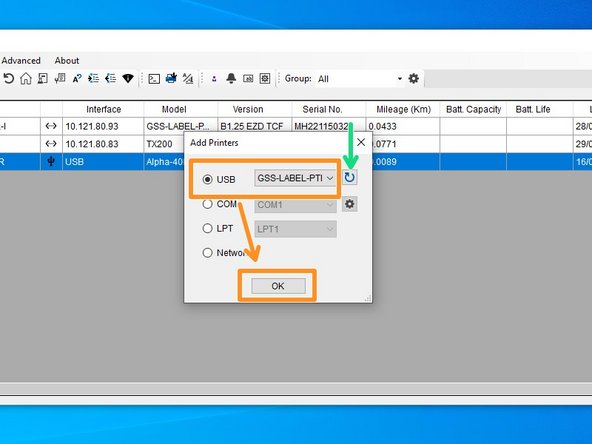
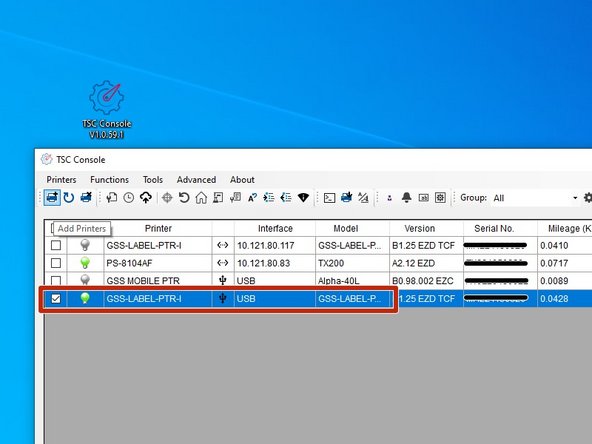
Select "Add Printers" shown by the red box.
-
Confirm that 'USB' is selected. The drop down next to it should read 'GSS-LABEL-PTR-I.' These are both shown by the orange box.
-
Click 'OK.'
-
If the printer does not appear in the dropdown, click the "Refresh USB List" button shown by the green arrow. If it still does not appear, try turning off the printer, waiting a moment for it to fully power off, then powering it back on and repeating this step. Also make sure the Print Tool is loaded on the computer that the printer is connected to
-
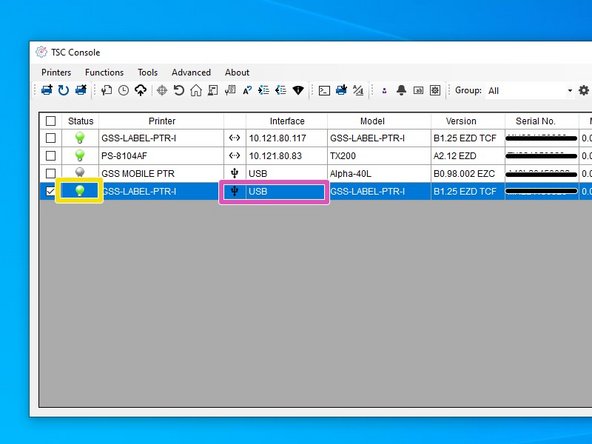
Under status, a green bulb will appear for the printer when it is online, and it will turn grey when it turns offline.
-
Under 'Interface,' it should read as USB and the USB symbol will appear to the left of it
-
-
-
For labels to be sent to this printer, the device will have to be connected to your network and be given an IP address. For the best results, this IP address should never be changed. To do that, if you are not IT, you will need to get the IT department involved for the following steps.
-
There are two ways to set an IP address. The first way is through DHCP reservation, and the second is by assigning a static IP address.
-
DHCP reservation begins with an IP address being given to a device automatically. Then, the IT department can indefinitely reserve the IP & MAC addresses so that no other device, current or future, will ever be given that specific IP address.
-
A static IP can be given to you by the IT department, then manually typed into the printer. This method will also keep the IP address from ever being used for another device.
-
Both the Static and DHCP reservation methods will be covered in this guide, along with how to see the IP & MAC addresses.
-
Wired and Wireless connections both have separate and unique MAC addresses. If you plan on using Wired and Wireless connections at the same time, you must have a unique IP address for both.
-
-
-
Launch the GSS Certified Printer Tool software.
-
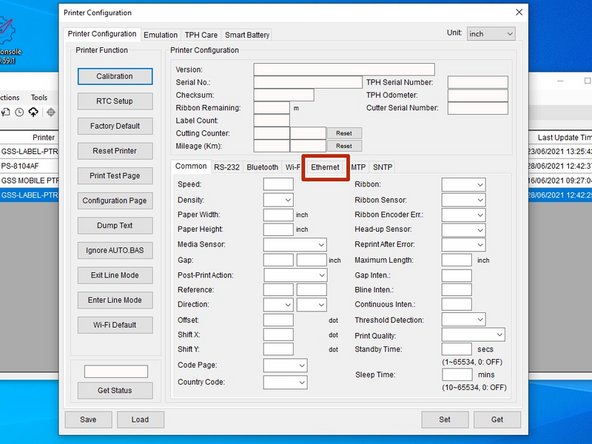
Double click the printer name, 'GSS-LABEL-PTR-I,' to open up the Printer Configuration Menu.
-
In the Printer Configuration Menu select the 'Ethernet' tab in this menu.
-
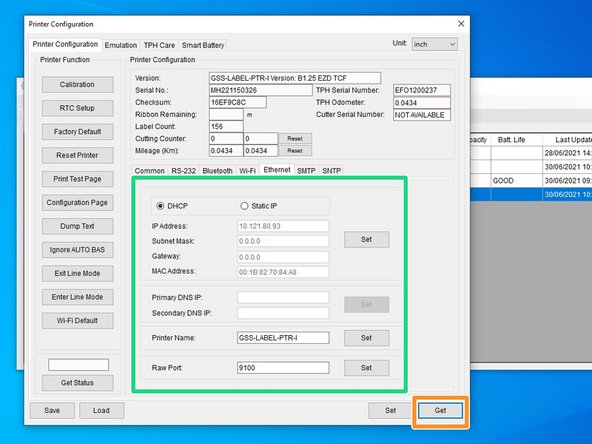
Click on 'Get' in the bottom right hand of the pop up, shown by the orange box.
-
The fields will now populate with information given from the printer, shown by the green box.
-
-
-
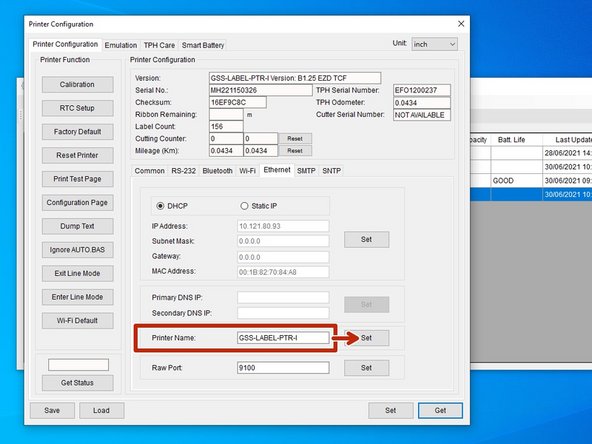
You may change the printer's ethernet name in this menu.
-
Set the printer's name to anything you want that's simple and easily understood. For example, GSS-PTR-TST for Global Shop Solutions Printer Test.
-
There is a character limit of 15 characters for the name. If there are more than 15 characters, the printer name will not be applied.
-
If you changed the name, apply this change by clicking 'Set' next to the 'Printer Name' text box.
-
After you click 'Set,' the printer will restart. This is normal.
-
-
-
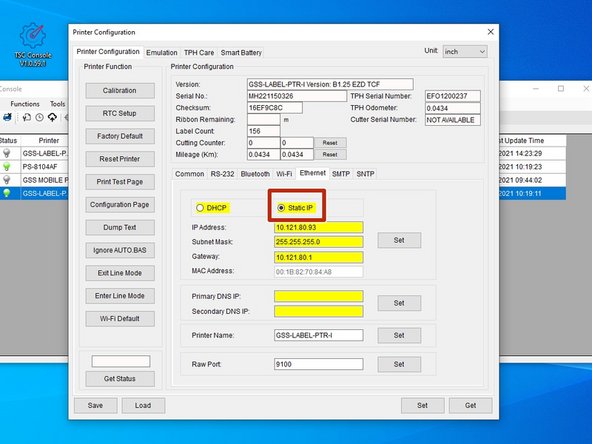
You will need: IP Address, Subnet Mask, and Gateway.
-
On the 'Ethernet' tab, click on 'Static IP.'
-
Refer to Step 32 on how to get to the 'Ethernet' options if necessary.
-
You can now change the IP to whatever you need. This change can be made by clicking into the green box shown in Image 2.
-
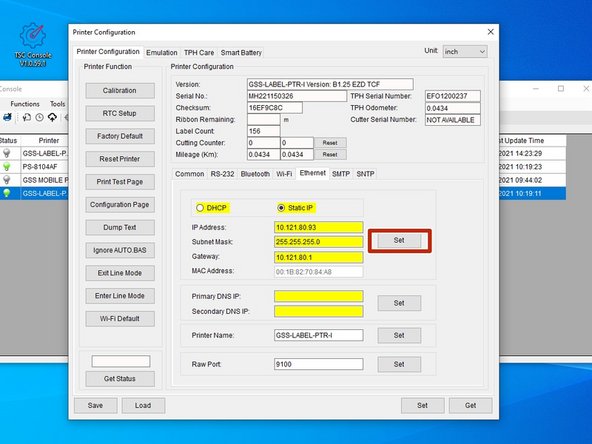
Once you create your new IP, click 'Set' next to the 'IP Address' text box.
-
After you click 'Set,' the printer will restart. This is normal.
-
-
-
This guide will cover how to load the printer drivers on the GSS DB server, either by you or by your GlobalShop Rep. You only need to install the drivers once. If you are unsure what to do, please wait for you GlobalShop Rep to help.
-
Printer driver link can be found HERE.
-
If you are waiting for your GSS Representative to install printer drivers on the server, then skip to Step 47 or click HERE.
-
When looking for this printer in the driver, you will use this printer name: TTA2100
-
-
-
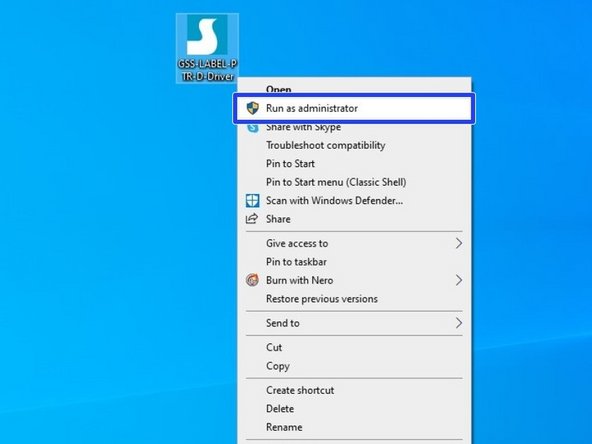
After downloading the driver program, right click the program and click "Run as Administrator."
-
While downloading and initializing the software, you may encounter slightly different pop-ups. This depends on your Admin Privilege on the device you are using.
-
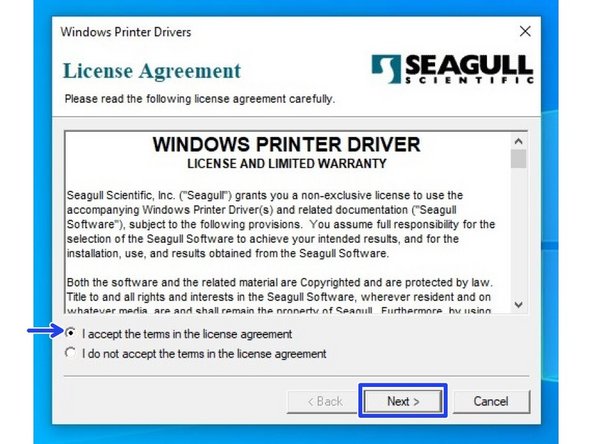
Review the EULA. If you agree to the terms of use, select the appropriate response and press the "Next" button.
-
-
-
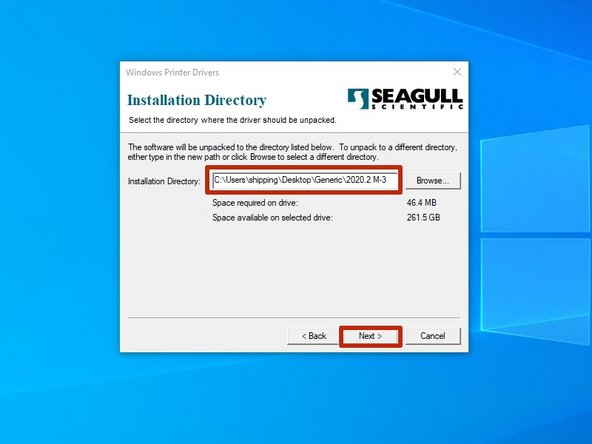
Review the Installation Destination and charge the location, if desired. Click "Next" to continue.
-
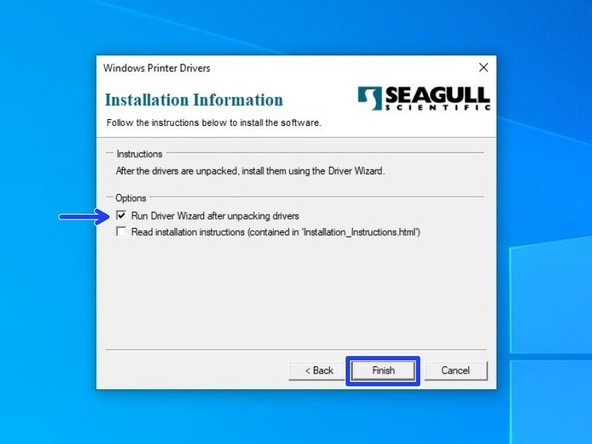
Choose to "Run Driver Wizard..."; the second option is unnecessary. Then select "Finish."
-
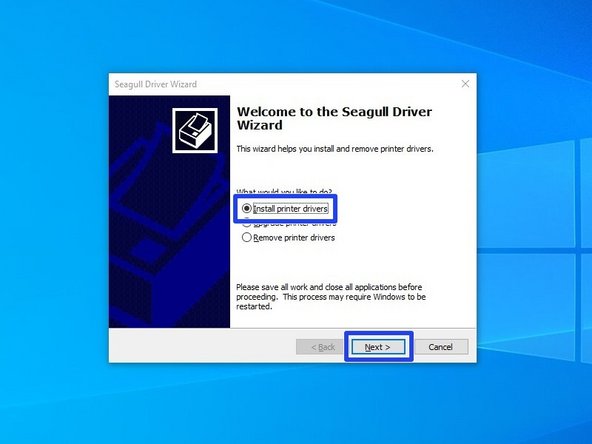
After installation is completed, the Driver Wizard will start. Choose the option to "Install printer drivers" and click "Next."
-
-
-
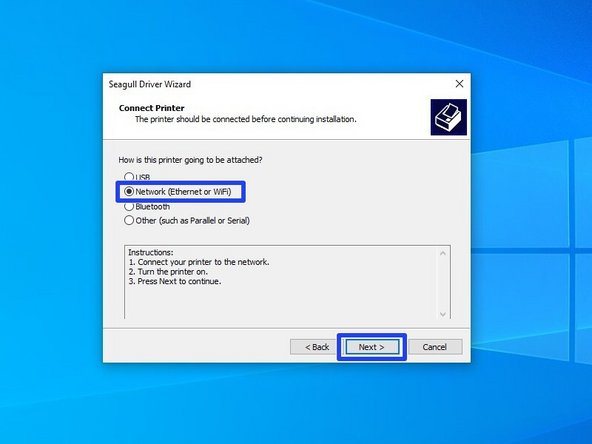
Choose the option for "Network (Ethernet or WiFi)," then click the "Next" button.
-
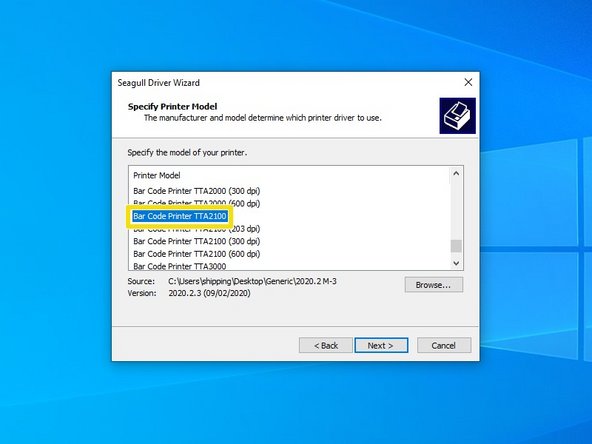
Scroll down until you fin the Printer Model "Bar Code Printer TTA2100." Click on it, and while it is highlighted, click the "Next" button.
-
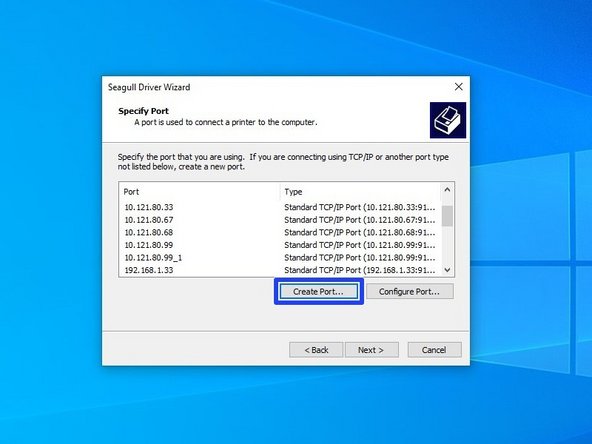
Select the option to create a port.
-
-
-
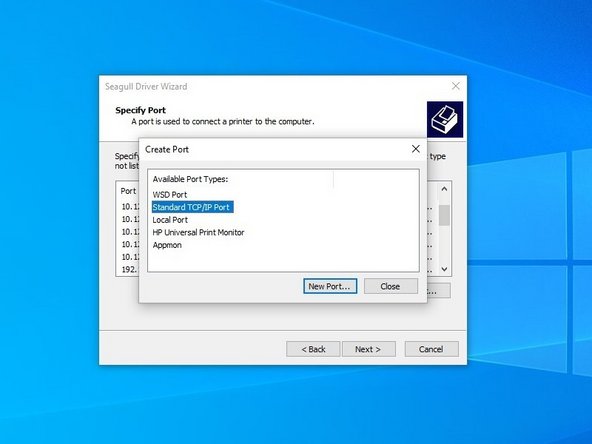
Select "Standard TCP/IP Port," and then click "New Port."
-
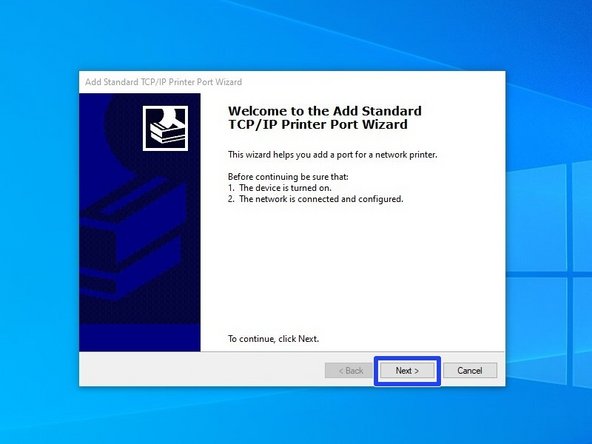
Make sure the printer is turned on, connected to the network, and configured, then select "Next." If you've followed this guide so far, you should be good.
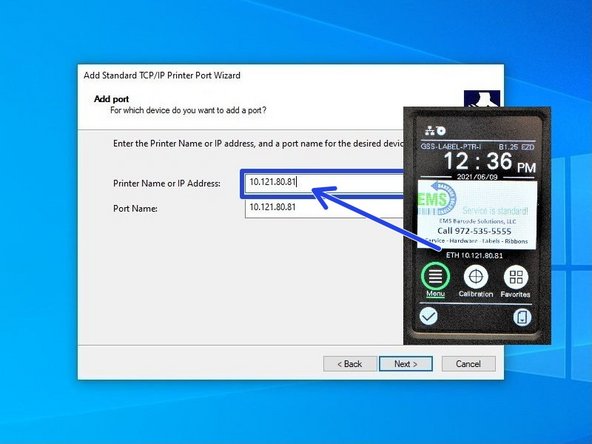
-
For the IP Address, list the IP that you set for your printer (it will be displayed on the printer's screen).
-
-
-
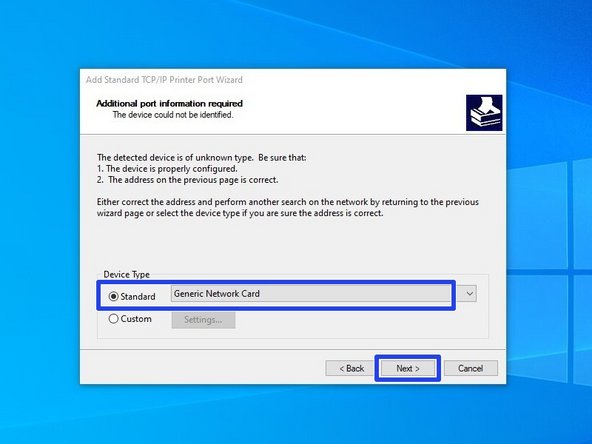
Select the option for "Standard" device type, and from the dropdown select "Generic Network Card" - this is the built-in network card of the printer. Once it's selected, hit the "Next" button.
-
Review the selections, then hit "Finish."
-
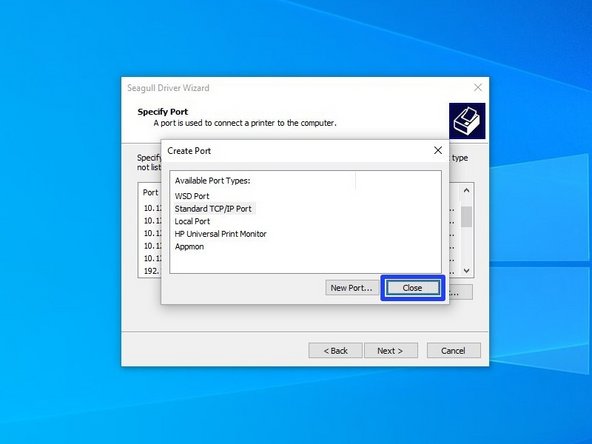
Once the Wizard is done making the port and closes, click "Close" to close the "Create Port" window as well.
-
-
-
Select the new port you just made, and hit "Next."
-
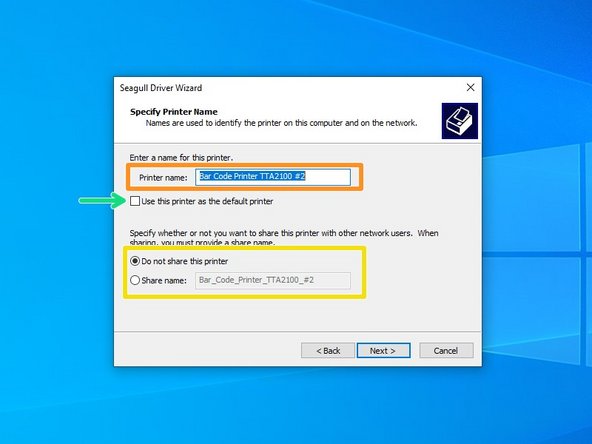
There are some options that can be customized before installation of the driver. You can choose to rename the printer (Orange). Hit "Next" when you've made your choices.
-
For standard setup, we recommend against:
-
Setting the printer as default printer (green).
-
Sharing it (yellow).
-
If you do not know what these settings do, please do not edit them.
-
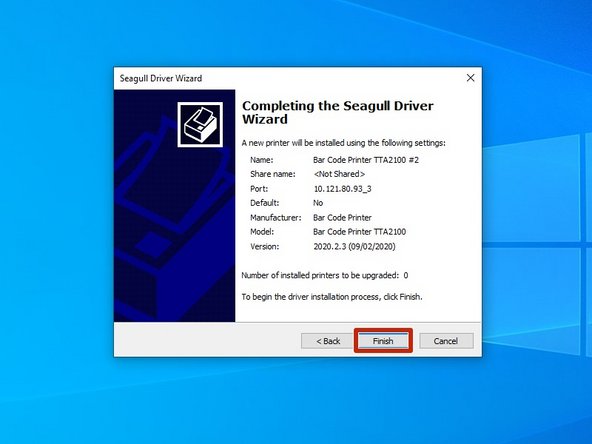
Confirm setup option before pressing "Finish". If anything needs to be changed, press "Back".
-
You may receive a Security Warning from Windows. If you do, choose the option to "Install".
-
-
-
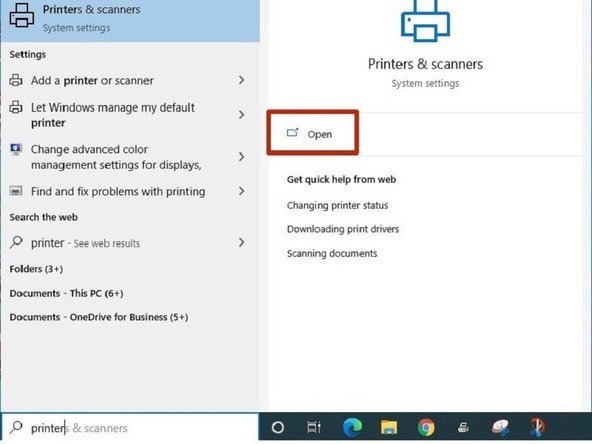
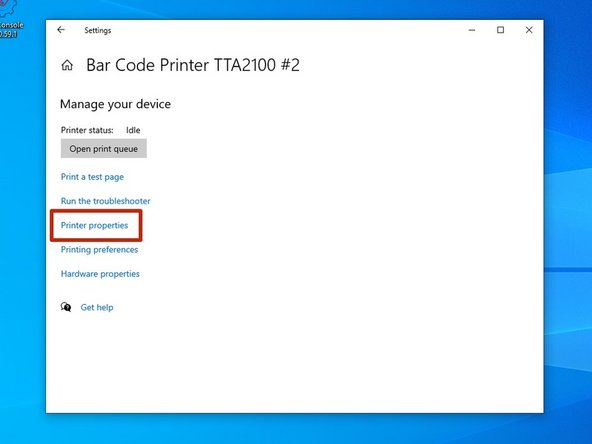
Search for 'Printers & Scanners' in the Windows taskbar search bar.
-
Confirm that the selection looks like the first picture, and hit "Open."
-
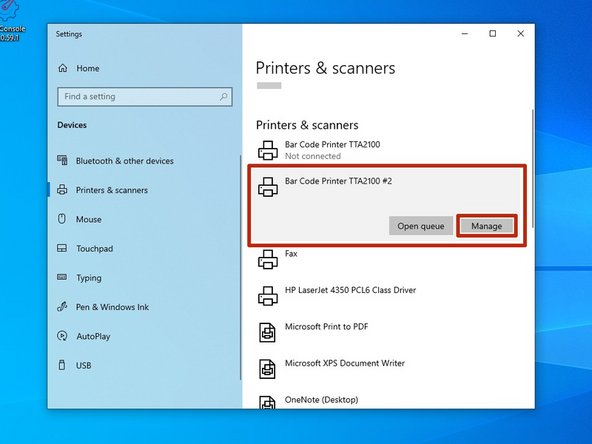
Click on the printer you set up in the previous guides.
-
In this case, I named the printer "Bar Code Printer TTA2100 #2."
-
Select the "Manage" option.
-
Select the "Printer Properties" option.
-
-
-
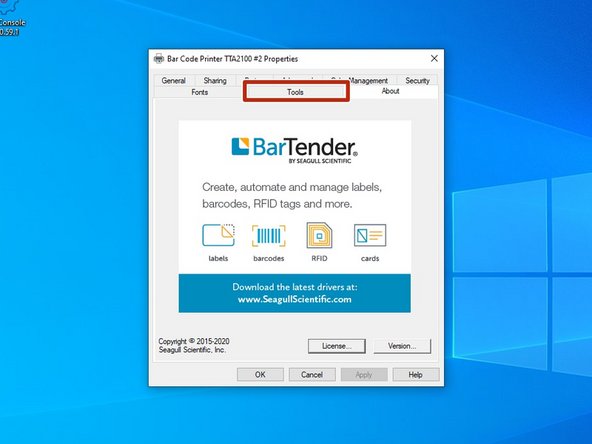
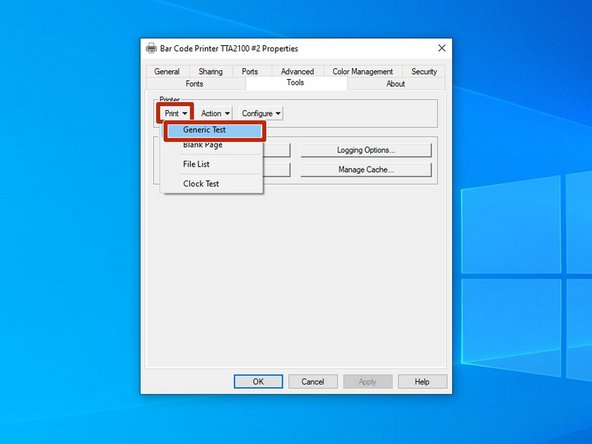
Select the "Tools" tab at the top of the new window.
-
Click on the drop-down menu labeled "Print" in the "Printer" section.
-
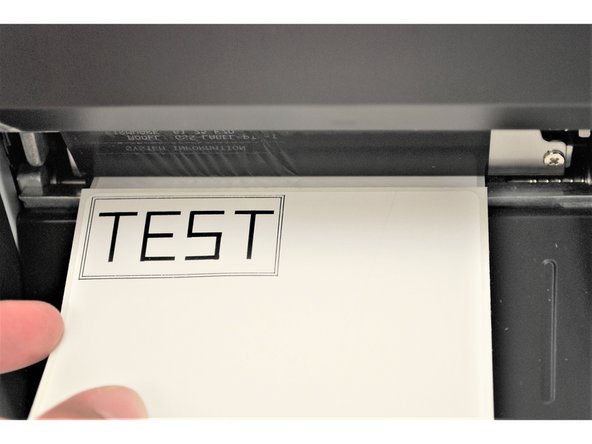
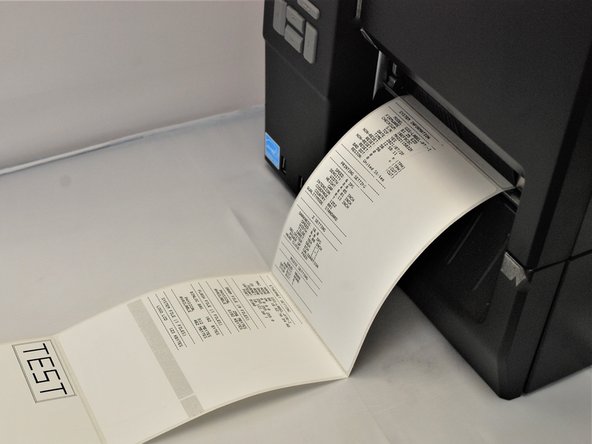
Select "Generic Test" from the list of options.
-
This should print a test label, which should look like the example image.
-
If no page printed, check that the roll of labels is loaded correctly, and that the correct printing options are selected.
-
The Printer is now successfully communicating with the driver.
-
-
-
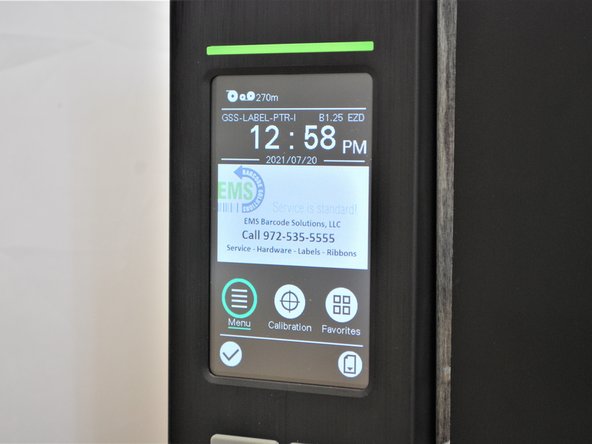
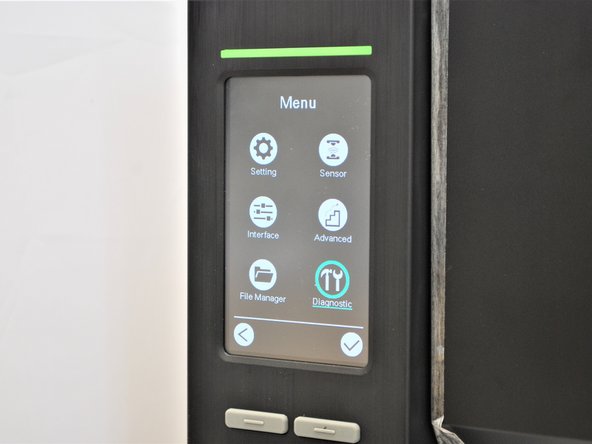
Select the 'Menu' on the home screen of the printer
-
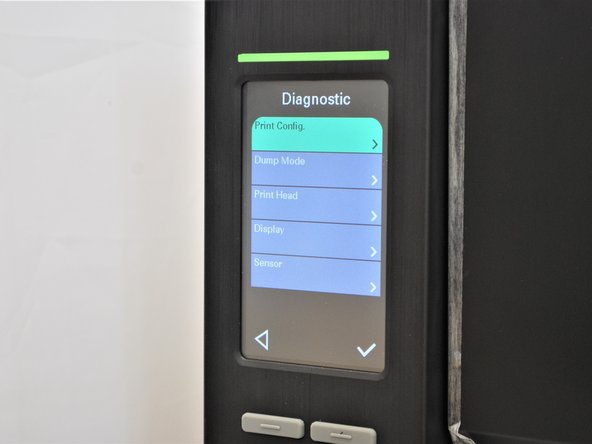
Choose 'Diagnostic'
-
Select 'Print Config'
-
-
-
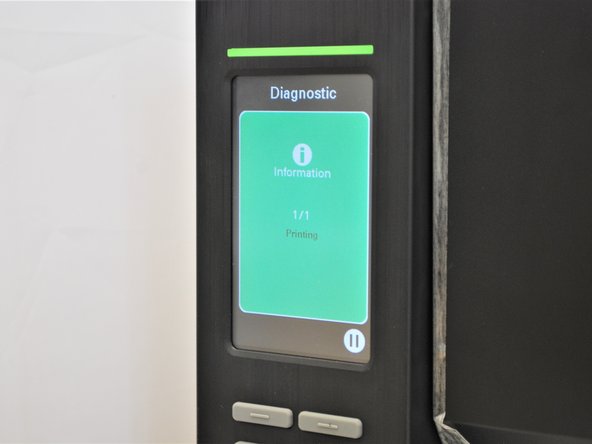
The printer will begin printing and you will see the screen shown in Image 1.
-
Once it is done printing, you will then have the three labels shown in Image 2 from the Test print and the Configuration Print.
-
Congratulations! You have now successfully set up your new GSS-LABEL-PTR-I!
-