-
-
The screen and buttons can be used to perform numerous printer functions without the use of a separate computer.
-
There is: the screen, which displays information and menus. It functions as a touch screen, for easier menu navigation.
-
The Up, Down, Left, & Right buttons, which will scroll up and down through menu lists as well as left and right.
-
The Select 1 Button, which correlates to the symbol above it.
-
The Select 2 Button, which correlates to the symbol above it.
-
Back Symbol. which takes you back to the previous screen you were on.
-
Select/Confirm Symbol, which selects the icon you have highlighted.
-
Feed Symbol, which feeds loaded labels through the printer.
-
-
-
The Home screen displays the printer's network connection;
-
If there are labels (white if labels are loaded, red if not);
-
The printer's model number;
-
The time and date;
-
EMS's logo and phone number;
-
'Menu,' which takes you to the larger list of menus available;
-
'Calibration,' which gives you an option to calibrate the printer for Gap, Black Mark, and Continuous printing;
-
'Favorites'
-
-
-
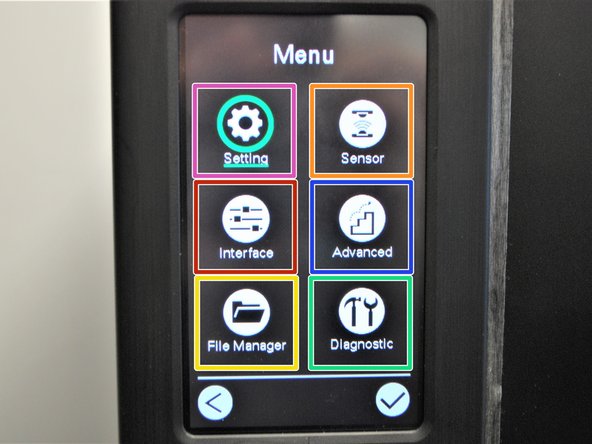
If you select the 'Menu' option from the home screen, you'll be brought to this screen. You can scroll through the options with the left, right, up, and down buttons.
-
The Settings menu is used for
-
The Sensor menu is used to calibrate the selected sensor. It has options for manual and automatic calibration for gap, black mark, and continuous printing.
-
The Interface menu is used o view and configure serial, ethernet, Bluetooth, or Wi-Fi connection settings.
-
The Advanced menu is used to configure screen, date & time, cutter, language, and security settings.
-
The File Manager menu is used to check the printer's available memory and file list.
-
The Diagnostic menu can be used to run a number of self-diagnostic utilities. Using the Diagnostic Tool software on a connected computer is recommended.
-
-
-
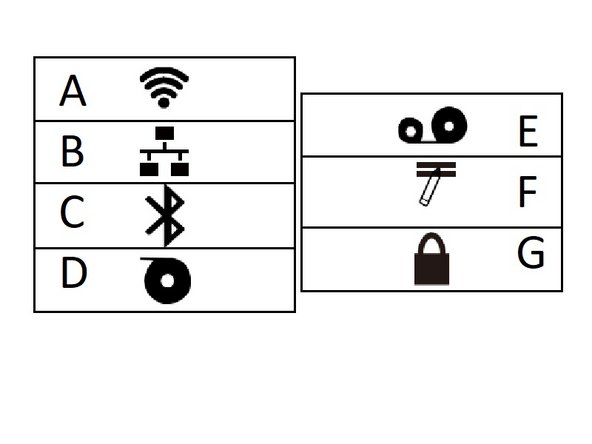
A. Wi-Fi Device is Ready (Option)
-
B. Ethernet is connected
-
C. Bluetooth device is ready (option)
-
D. Media capacity (%)
-
E. Ribbon capacity (m)
-
F. TPH cleaning
-
G. Security lock
-